A new-generation digital satellite receiver
REVERA.TV presents. For the first time on the European market.
 The year’s most anticipated receiver, built around an entirely
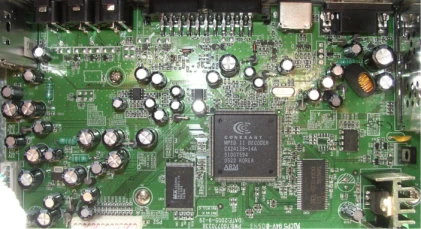
new 32-bit Conexant CX24138 RISC processor rated at 112 MIPS.
The processor offers fast scanning and channel switching, plus blind scanning that requires only frequency and symbol-rate limits. Besides PAL and NTSC, the video output can also use SECAM!
Brightness, contrast, saturation and tint can be adjusted over a wide range in the receiver menu. Built using a 0.13-micron process, the processor produces little heat and does not require a heatsink.
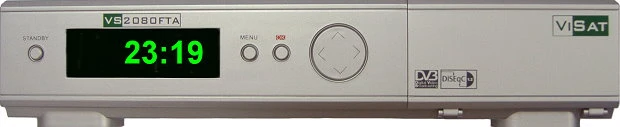
MAIN SPECIFICATIONS:
— DVB-S / MPEG-2 compatible
— memory for 4,000 TV/radio channels and 2,000 transponders
— one F-type LNB input
— C/Ku-band satellite reception
— 256-colour on-screen display (OSD)
— NTSC, PAL and SECAM support
— 4:3 and 16:9 formats, pan-and-scan or letterbox
— TV SCART and S-Video outputs
— 0/12 V switch control
— two pairs of RCA audio outputs
— UHF PLL TV modulator, channels 21–69
— DiSEqC 1.0/1.2 and USALS positioning
— menu languages: Russian, English, French, German, Turkish, Greek, Arabic, Italian and Farsi
— multilingual audio-track selection
— scanning using satellite table headers
— automatic satellite and transponder discovery, including blind scanning
— electronic programme guide (EPG)
— teletext
— subtitles
— eight favourite-channel lists
— enhanced channel navigation
— video displayed while using menus
— 16-picture multi-window scanning
— software and settings transfer from a computer or another receiver via RS-232
— ten-event timer
— picture zoom
— pause mode
— four games
— parental control
The receiver comes in a colourful, sturdy cardboard box whose top folds into a carrying handle.
The package contains the ViSat VS2080FTA, remote control, Russian-language manual, packaging and an AV cable for connection to a TV.
Despite the processor’s low power consumption, do not place the receiver in a poorly ventilated location or cover its ventilation openings with other equipment or objects, as this can cause failure.
Make connections only with all equipment disconnected from power. The original instructions state that failure to do so voids the receiver’s warranty.
Check that the satellite dish is grounded to help protect the receiver and other equipment from lightning-related damage.
Again: switch off power to the receiver and all other equipment before making any connections!
The front-panel buttons provide access to almost every menu operation:
— standby switches the receiver between operation and standby;
— to the right, behind the black insert, a four-digit seven-segment display shows status information:
— the current time in standby;
— the channel number during operation;
— after pressing UHF on the remote, the RF output channel of the PLL modulator;
— menu opens or closes the menu, or returns to the previous level;
— OK opens a submenu or confirms an action.
The joystick-style buttons work as follows: Up and Down move between menu items;
— Left and Right change a parameter’s value.
The rear panel provides the following connections:
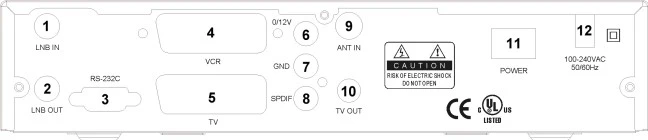
1. F-type IF input from the dish LNB;
2. F-type LNB loop-through output;
3. RS-232 serial port for a computer or another receiver;
4. S-Video connector for a TV or VCR;
5. TV SCART connector;
6. Composite video output;
7. 0/12 V output for switching external devices;
8. First right-channel audio output;
9. Second right-channel audio output;
10. First left-channel audio output;
11. Second left-channel audio output;
12. VHF/UHF antenna input when using the TV’s RF connection;
13. RF output to the TV antenna input;
14. Power switch;
15. Mains cable for approximately 220 V AC.
To open preferences, press menu on the front panel or remote,
 select Preferences with Up and Down, then press OK.
  A menu with seven items appears. Let’s look at them in detail.
The first section, System settings, contains four items:
— OSD language: ten languages are available. Select with Left/Right (Volume −/+) or press OK to choose from the list.  Available languages are English, Turkish, Greek, Arabic, French, German, Italian, Persian, Russian and Dutch;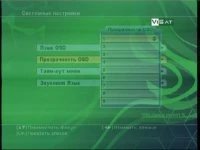
— OSD transparency: ten levels, from barely visible to opaque;
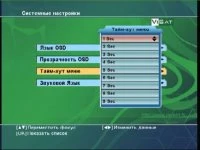
— menu timeout: the information panel displayed after a channel change can remain on screen for 1–10 seconds; 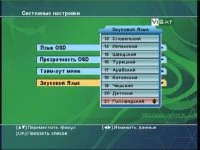
— default audio language: choose from 21 languages. If a channel carries multiple audio tracks, the receiver selects the language specified here.
The next section is AV setup, with seven items:
— screen aspect ratio: 4:3 or 16:9; 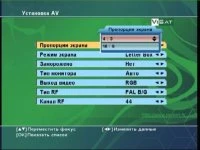
— the mode for displaying widescreen 16:9 material on a standard 4:3 TV; 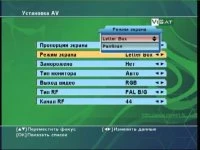
— freeze: Yes or No. When enabled, the last frame remains visible during channel changes instead of a black screen, until the new picture appears;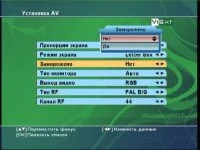
— monitor type selects the output TV standard. Auto preserves the incoming standard; a manual selection converts the signal. The four choices include SECAM; 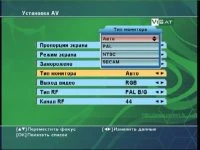
— video output selects the format sent through TV SCART:  CVBS is the most common connection, but offers the lowest quality apart from RF. Luminance, colour and sync share one cable;
YC, also called S-Video, improves quality by keeping luminance and colour separate;
— RGB offers the best of these options, but the TV must have a SCART socket with working RGB inputs;
 — RF type: the broadcast standard used in your country. This matters for an older, non-multistandard TV connected through its antenna input. The original setup uses D/K with 6.5 MHz spacing between video and audio carriers;
 — RF channel: choose any free UHF channel from 21 to 69 that is not used by local broadcasting. The same setting is available through the remote’s UHF button.
Next are the video settings.  This unusual user-accessible section resembles a processor service menu. It provides extensive adjustment of brightness, contrast, saturation and tint; tint also works in PAL and SECAM as well as NTSC. Press OK to save changes or Reset to restore the defaults.
To configure the receiver, press menu on the remote or front panel and select Installation. It contains six items:
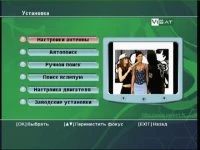
— antenna settings;
— automatic search;
— manual search;
— blind search;
— motor settings;
— factory settings.
These menus define each satellite’s settings, including LNB type and DiSEqC port.
Antenna settings has nine items. The first is the satellite name.  Choose one of the 64 satellites whose parameters are stored in the receiver. Use Volume +/− to cycle through them, or press OK to select from a list.
The second item is Transponder.  The list of transponders on the satellite selected above.
 The third item is LNB type.
Choose the LNB type used in your system. Four options are available: Universal, with two bands and 9750/10600 MHz local oscillators; Normal, a similar mode with manual settings; OSC C-band, for C-band LNBs; and Wide band, a single-band LNB with a 10750 MHz local oscillator.
 The fourth item is the low local-oscillator frequency, selected from a list or entered manually.
 The fifth is the high local-oscillator frequency, or the oscillator frequency of a single-band wideband LNB.
 The sixth item, 22K, enables or disables the 22 kHz tone used to switch bands on a universal LNB.
 The seventh item controls the rear-panel RCA 0/12 V output for external switches.
 The eighth is DiSEqC switch settings. Specify the switch port connected to the selected satellite’s LNB.
  The ninth is LNB power. Option 1 automatically supplies 14/18 V according to the transponder’s polarisation. Option 2 appears to switch LNB power off. Options 3 and 4 force vertical or horizontal polarisation.
 Wherever signal and quality meters appear, pressing INFO on the remote enlarges them, which is useful when aligning a dish.
The next Installation menu item is Auto search.
 Mark the satellites to scan with OK and start scanning with the blue button. The red button returns to LNB settings if you need to make changes.
 Before scanning, enable or disable NIT and choose encrypted, free-to-air or all channels. The LNB settings are shown at the bottom right. Press OK and wait; the following screen appears:
  The scan is complete: 137 TV channels and 38 radio channels have been found.
Back in Auto search, the green button lets you add transponders:  enter the frequency, symbol rate and polarisation. There is no need to enter the error-correction rate. The meter immediately indicates a signal when the parameters are correct.
 The yellow button opens a window to rename the current satellite. Choose characters with Volume +/− and CH+/CH−.
When you move from the satellite list on the left to the transponder list on the right, the red button opens transponder editing,  and the yellow button deletes the selected transponder. Warning: there is no deletion confirmation!
The third Installation item is Manual search.
 Unlike Auto search, this scans only the transponders you select and configure manually, rather than every stored transponder. First select the satellite, then the transponder in the second row.
 Enter the frequency with the numeric keys in the third row, the symbol rate below it, and polarisation in the fifth row. The final two rows select free-to-air, encrypted or all channels and enable or disable network search.
 The colour-key descriptions at the bottom show that red returns to LNB settings, while green deletes the transponder selected in the second row without warning.
 Yellow opens manual PID entry using the numeric keys. The fourth Installation menu item deserves particular attention.
  Blind search needs no transponder list. It scans a satellite for channels without preset transponder parameters. The powerful processor makes the scan relatively quick. Set only the start and end frequencies, the symbol-rate limits and polarisation.
  The red button opens Antenna settings; menu takes you back.
  The next item discussed is Motor settings. It is relevant to systems with a DiSEqC positioner and contains eight settings:
  first select the satellite, or rather the orbital position to store. Next choose the positioning protocol: DiSEqC 1.2 or USALS.
  For USALS, select a working transponder and enter the installation site’s latitude and longitude. The calculations that follow feel like technological magic. The result is simple: orbital positions are calculated for you, leaving you free to watch TV. The motor must, however, support USALS.
  With DiSEqC 1.2, positions are set manually using Left/Right and the signal meters. Travel limits must also be set manually in the limit settings. The return-to-reference option moves the motor to zero.
  The final item is Factory settings. Choosing Yes resets all settings and erases channel lists and satellite positions. Be careful: you will need to configure the system again.
The next main-menu section is Channel management.  It has two submenus: Edit channels and Set favourites. Let’s start with the first.
At the top left is a preview of the channel selected on the right. Below it are the satellite name, transponder frequency, symbol rate, polarisation and main PIDs. 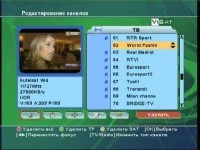
Five icons select the action for the highlighted channel: delete, parental lock, move, rename or sort. Confirm with OK.
In Delete mode, the colour keys provide these actions:
red — delete all;
green — delete the selected channel’s transponder;
yellow — delete the selected channel’s satellite.
Items marked for deletion display a cross. Changes take effect after confirmation when you leave with menu.
 To move channels, select a channel and press OK; an up/down arrow appears beside it. You can mark a whole group this way. Press red to turn the arrows into check marks, move the group with CH+/CH−, and confirm with OK.
  The channel list can be sorted by:
— alphabetical order;
— satellite;
— free-to-air before encrypted;
— encrypted before free-to-air;
— favourites.
The screenshot shows the Rename function: you can give channels the names you prefer.
The second Channel management item is Set favourites.  All scanned channels appear on the right. Press OK on a channel to add it to the list selected with FAV. A channel can belong to several lists. A heart appears beside it, and the relevant list names appear in the red area below.
  Red lets you rename fav1–fav8. TV/RADIO switches to radio channels.
The receiver includes four games for you and your children.
 The first is classic Tetris, which hardly needs an introduction — almost everyone has played it.
 Boxman is another old favourite: move the boxes to clear a route to the exit, then advance to the next level.
 Canvas is a version of Lines. Arrange matching balls in a line or another pattern chosen at the start, score points and keep the board from filling up.
 Goubang appears, from its name, to be another Chinese line-making game. Give it a try and the rules should become clear.
Software for ViSat digital satellite receivers.
|

Updating ViSat firmware and settings from a personal computer.
Required tools: an RS-232 null-modem cable and CNX Uptool.
Connection: Connect the computer and DVB receiver through their RS-232 ports using a female-to-female null-modem cable. Make the connection with the receiver unplugged from the mains and both devices properly grounded.
Firmware update procedure:
1. Start CNX Uptool on the computer.
2. Select COM1, COM2 or whichever port the receiver is connected to.
3. Power on the DVB receiver and wait until it has fully started.
Note: before this step, the receiver must be completely disconnected from the mains.
4. Click upgrade application and choose the file. Verify its integrity and compatibility with your receiver; an incorrect file can leave the receiver inoperable.
5. Click OK to start uploading. If it does not start, repeat the previous four steps. Progress appears on the computer and as a percentage on the receiver’s display.
6. After the indicator reaches 100%, wait for the data to be written to memory. The receiver will restart automatically.
Note: do not interrupt the transfer during steps 5 and 6 before it is fully complete!
The processor specification is provided in the pdf Conexant document.
Specifications summary
| Tuner |
| Input connector | F-type, IEC 169-24, female |
| Frequency range | 950–2150 MHz |
| Input impedance | 75 ohms, unbalanced |
| Signal level | −75 to −15 dBm |
| IF | 460 MHz |
| IF bandwidth | 36 MHz |
| LNB power and polarisation | +14 V vertical; +18 V horizontal; 400 mA maximum current; short-circuit protection |
| 22 kHz tone switching | Frequency: 22 ± 4 kHz. Amplitude: 0.6 ± 0.2 V |
| DiSEqC protocol | Versions 1.0/1.2 compatible |
| Demodulation | QPSK |
| Input symbol rate | 1-45 Ms/s |
| FEC decoder | Convolutional code rates: 1/2, 2/3, 3/4, 5/6 and 7/8 |
| MPEG audio/video transport-stream decoding |
| Transport stream | MPEG-2 ISO/IEC 13818-1 Transport stream specification |
| Profile Level | MPEG-2 MP@ML |
| Input rate | 60Mbps (Serial)/7.5 MBps (Parallel) |
| Picture format | 4:3, 16:9 |
| Video resolution | Max. 720x460 @30fps NTSC & 720x576 @25fps PAL |
| Audio decoding | ISO/IEC 13818-3 |
| Audio mode | Mono, Dual-channel, Stereo, and Joint Stereo |
| Sampling rate | 32, 44.1 and 48 kHz |
| System and memory |
| Main processor | Conexant CX24138 (100 MHz) |
| Flash memory | 2 Mbyte |
| Graphics (MPEG) and system RAM | 8 Mbyte |
| EEPROM | not fitted |
| Hard disk | not fitted |
| Channel capacity | 4000 |
| Number of supported satellites |
64 |
| Menu languages | All European languages plus Russian |
| Front-panel buttons | STANDBY, MENU, OK, CHANNEL +/−, VOLUME +/− |
| Remote control | Infrared, 38 kHz carrier; two AAA batteries |
| Audio, video and data inputs/outputs |
| Video | SCART/TV, S-Video, RCA/Cinch Video Output(CVBS) |
| Audio | 2xRCA/Cinch Volume and Mute Control |
| 0/12 V | available |
| Digital audio output | not fitted |
| RS 232 | 115,200 bps, 9-pin D-sub |
| USB | not fitted |
| LAN | not fitted |
| Conditional access |
| Built-in module | not fitted |
| External modules | not fitted |
| SoftCAM | available |
| TV modulator |
| RF connector | IECM/IECF |
| Frequency | 470-860 |
| Output channels | Channels 21–69 |
| Standards | B/G, D/K |
| Power supply |
| Input voltage | 100–240 V AC, 50/60 Hz |
| Power-supply type | Switch-mode (SMPS) |
| Power consumption | 12 W maximum |
| Protection | Internal overcurrent fuse and overvoltage varistor |
| Physical specifications |
| Dimensions | Width 280 mm, height 60 mm, depth 240 mm |
| Weight | Up to 1.4 kg |
| Operating temperature / storage temperature |
0 to +45 / −10 to +70 °C |
Copying firmware and settings between receivers.
Required equipment: an RS-232 null-modem cable and a source receiver of the same model. We will call it the reference receiver.
Connection: Connect the reference and target receivers through their RS-232 ports with a female-to-female null-modem cable. Make the connection with the mains plugs removed and both devices properly grounded.
Firmware update procedure:
1. Switch on the reference receiver and wait until it has fully booted.
2. Switch on the target DVB receiver.
Note: the target receiver must be completely disconnected from the mains before this step.
3. The target receiver’s display shows transfer progress from 1 to 100%.
4. After 100%, wait for the information to be written to memory. When GOOD appears, the receiver may be switched off. Both receivers now have identical firmware and settings. No TV connection is required for this procedure.
Note: do not interrupt the transfer during steps 2, 3 and 4 before it is fully complete!